
【ハンズオン】AWS Amazon Linux でAPIスタブサーバーを立ち上げる
皆さん、こんにちは。
本日のブログでは、開発・テスト効率を大幅に向上させるAWS上でのAPIスタブ環境の構築方法を、具体的なステップと共に解説します。
Amazon Linux 環境(今回はAmazon Linux 2023)でApacheとPHP-FPMを連携させ、本番に近い形でAPIの動作検証を行うための実践的な手順をご紹介します。

1. はじめに:なぜAPIスタブが必要なのか
APIスタブは、開発中のシステムがまだ完成していない外部APIに依存している場合や、外部APIの利用に制限がある場合などに非常に役立ちます。
- 並行開発の促進: 外部APIの実装を待たずに開発を進められます。
- テストの安定化: 外部要因に左右されず、安定したテスト環境を提供します。
- コスト削減: 有料APIの利用回数を減らし、開発・テストコストを削減できます。
本稿では、PHPを用いてSCIM (System for Cross-domain Identity Management) および汎用APIのスタブ環境を構築する手順について詳しく解説します。SCIMは、異なるシステム間でユーザーID情報を自動的にプロビジョニングおよびデプロビジョニングするための標準プロトコルです。(SCIMについての詳細はこちらを参照してください。)
モックアップ環境としてAPIスタブがあれば、SCIM対応アプリケーションやAPI連携機能を開発する際に、実際のSCIMプロバイダーやAPIサーバーが利用できない状況でも効率的に開発を進められます。
2. 前提条件と準備
- AWSアカウント: AWSアカウントを準備してください。
- SSHクライアント: サーバーに接続するためのエミュレーター(例: Windows Terminal, Tera Termなど)を準備してください。
3. AWS EC2インスタンスの起動
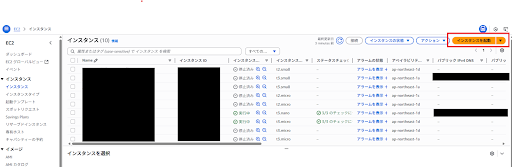
- AWSマネジメントコンソールにログインし、EC2ダッシュボードへ移動します。
- 「インスタンスを起動」をクリックします。
- 名前とタグ: 任意の名前(例: api-stub-server-al2023)を入力します。

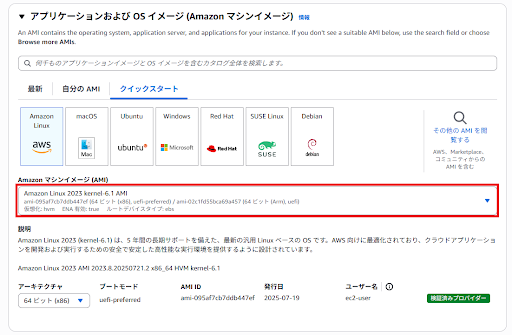
- アプリケーションおよび OS イメージ (Amazon マシンイメージ - AMI): 「Amazon Linux 2023 AMI」を選択します。
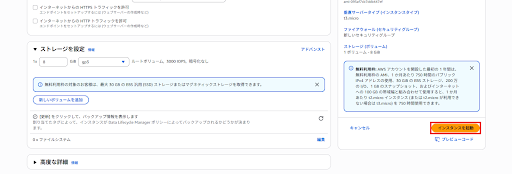
- インスタンスタイプ: 「t2.micro」や「t3.micro」(無料利用枠対象)などを選択します。

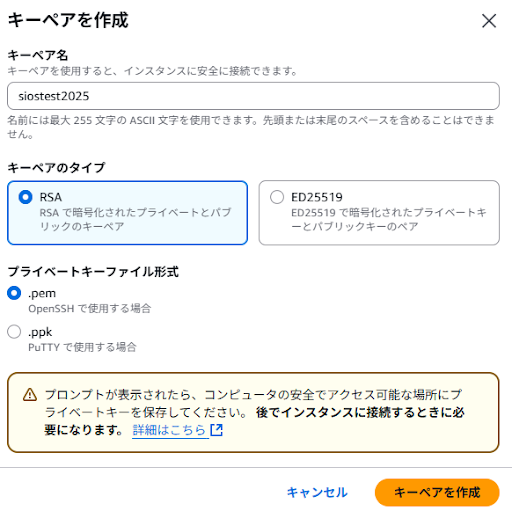
- キーペア (ログイン): 未作成の場合には新しいキーペアを作成し、ダウンロードされた.pem ファイルを安全な場所に保存してください。

-
- ネットワーク設定 (セキュリティグループ):
- 新しいセキュリティグループを作成します。
- インバウンドルール
・タイプ: SSH, ソース: マイIP (ご自身の現在のグローバルIPアドレス)
※HTTPSに関するインバウンドルールは、インスタンス作成後に手動でセキュリティグループに追加します。

- 「インスタンスの起動」をクリックし、インスタンスが「実行中」になるまで待ちます。(ストレージを設定 と 高度な詳細 については初期設定のまま変更不要です。)
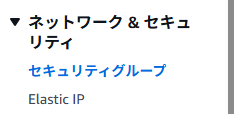
- 画面左側のメニューを開き、「ネットワーク&セキュリティ」→「セキュリティグループ」をクリックします。
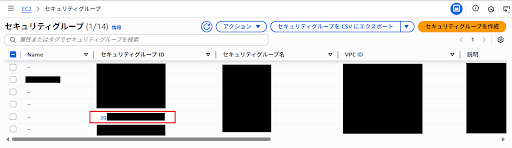
- セキュリティグループ一覧画面から、先ほど作成したセキュリティグループのセキュリティグループIDをクリックします。
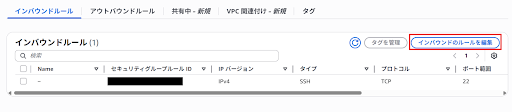
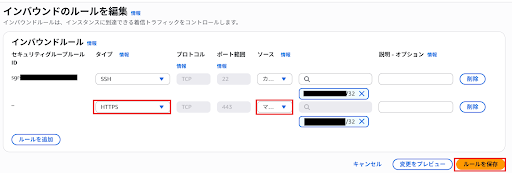
- 「インバウンドのルールを編集」をクリックします。
- 「ルールを追加」をクリックします。
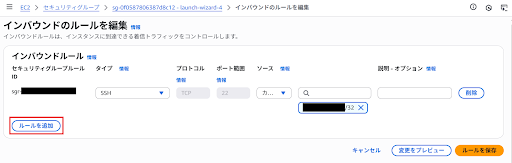
- 「タイプ」に「HTTPS」、「ソース」に「マイ IP」を選択し、「ルールを保存」をクリックします。(他にも接続を許可したいIPがあれば、必要に応じて適宜追加してください。)
4. サーバーへの接続と初期設定
- SSH接続:
- EC2インスタンスの詳細画面で「パブリック IPv4 アドレス」をコピーします。
- ターミナルまたはSSHクライアントから以下のコマンドで接続します(your-key-pair.pem はあなたのキーペアファイルに、ec2-user@<IPアドレス> は実際のIPアドレスに置き換えてください)。
$ ssh -i your-key-pair.pem ec2-user@<インスタンスのパブリックIPv4アドレス>
- パッケージのアップデートと必要なソフトウェアのインストール:
$ sudo dnf update -y
$ sudo dnf install -y httpd php php-fpm php-json mod_ssl
- PHP-FPMの設定:
・PHP-FPM の設定ファイルを開きます。
$ sudo vi /etc/php-fpm.d/www.conf
・以下の行を変更または追加します(Apacheユーザーで実行するようにします)。
user = apache
group = apache
listen.owner = apache
listen.group = apache
listen = /run/php-fpm/www.sock
・ファイルを保存してエディタを閉じます。
- PHP-FPMとApacheの起動と自動起動設定:
$ sudo systemctl start php-fpm
$ sudo systemctl enable php-fpm
$ sudo systemctl start httpd
$ sudo systemctl enable httpd
5. hostsファイルの編集
- EC2インスタンスのパブリックIPv4アドレスを確認:
AWSマネジメントコンソールで、あなたのEC2インスタンスのパブリックIPv4アドレスをメモしておいてください.
- ローカルPCのhostsファイルを編集します。stub.example.com がEC2インスタンスのパブリックIPv4アドレスを指すように設定します.
- Windowsの場合: メモ帳を管理者として実行し、C:\Windows\System32\drivers\etc\hosts を開きます.(パスは各自のOSのhostsファイルの場所に置き換えてください。)
- macOS/Linuxの場合: ターミナルで sudo vi /etc/hosts を実行します.(パスは各自のOSのhostsファイルの場所に置き換えてください。)
・ファイルの末尾に以下の行を追加します(<EC2インスタンスのパブリックIPv4アドレス> は実際にメモしたIPアドレスに置き換えてください)。
<EC2インスタンスのパブリックIPv4アドレス> stub.example.com
・ファイルを保存後、Windowsではコマンドプロンプトで ipconfig /flushdns、macOS/Linuxでは sudo dscacheutil -flushcache; sudo killall -HUP mDNSResponder を実行するか、PCを再起動して変更を反映させてください。
6. APIスタブファイルの配置と修正
・Apacheのドキュメントルートの作成:
$ sudo mkdir -p /var/www/stub
- ファイルの作成
- test.php ファイル(確認用)の作成:
$ sudo vi /var/www/stub/test.php でファイルを作成し、以下の内容をコピー&ペーストして保存します。
<?php phpinfo(); ?>
- index.php ファイルの作成:
$ sudo vi /var/www/stub/index.php でファイルを作成し、以下の内容をコピー&ペーストして保存します。
※'YOUR_API_TOKEN_HERE’の値には、テスト用のAPIトークンとして任意の複雑な文字列を設定してください。
<?php
// 強力なエラー表示設定(デバッグ時のみ)
error_reporting(E_ALL);
ini_set('display_errors', 1);
ini_set('display_startup_errors', 1);
ini_set('log_errors', 1);
ini_set('error_log', '/var/log/httpd/php_errors_main.log'); // メインのエラーログ

// デバッグログの初期設定
$debug_log_file = '/var/log/httpd/request_debug_main.log'; // メインのデバッグログ
function write_debug_log($message) {
    global $debug_log_file;
    file_put_contents($debug_log_file, date('[Y-m-d H:i:s] ') . $message . "\n", FILE_APPEND);
}
write_debug_log("--- Starting index.php (Front Controller) ---");
write_debug_log("REQUEST_METHOD: " . $_SERVER['REQUEST_METHOD']);
write_debug_log("REQUEST_URI: " . $_SERVER['REQUEST_URI']);
write_debug_log("SCRIPT_FILENAME: " . $_SERVER['SCRIPT_FILENAME']);
write_debug_log("PATH_INFO: " . (isset($_SERVER['PATH_INFO']) ? $_SERVER['PATH_INFO'] : 'N/A'));

// フロントコントローラーのロジック
// REQUEST_URIから、処理すべきAPIパスを特定
$request_uri = $_SERVER['REQUEST_URI'];
$api_path = strtok($request_uri, '?'); // クエリ文字列を除外

write_debug_log("API Path identified: " . $api_path);

// Bearer token (一元的にここで認証)
$bearer_token_main = 'YOUR_API_TOKEN_HERE';
if (!isset($_SERVER['HTTP_AUTHORIZATION']) || $_SERVER['HTTP_AUTHORIZATION'] !== 'Bearer ' . $bearer_token_main) {
    http_response_code(401);
    header('Content-Type: application/json; charset=utf-8');
    echo json_encode(['statusCode' => '401', 'errorMessage' => 'トークン情報が無効です。', 'statusText' => 'Unauthorized: Invalid or missing token.']);
    write_debug_log("Authentication failed in index.php.");
    exit;
}
write_debug_log("Authentication successful in index.php.");


// ルーティング
if ($api_path === '/api.php') {
    write_debug_log("Routing to api.php.");
    // api.php は関数定義のみにしているので、ここで呼び出す
    include '/var/www/stub/api.php';
    $input = file_get_contents('php://input');
    $data = json_decode($input, true);
    handleApiRequest($data); // api.php内の関数を呼び出し
} elseif (strpos($api_path, '/v2/Schemas') === 0 || strpos($api_path, '/v2/Users') === 0) {
    write_debug_log("Routing to scim.php. Path: " . $api_path);
    // scim.php のパス解析ロジックが $_SERVER['REQUEST_URI'] を直接使うように調整 (後述)
    // SCIM_ORIGINAL_REQUEST_URI を設定し、scim.php側で利用する
    $_SERVER['SCIM_ORIGINAL_REQUEST_URI'] = $request_uri;
    include '/var/www/stub/scim.php';
} elseif ($api_path === '/test.php') {
    write_debug_log("Routing to test.php.");
    include '/var/www/stub/test.php';
} else {
    write_debug_log("No matching route for: " . $api_path);
    http_response_code(404);
    header('Content-Type: application/json; charset=utf-8');
    echo json_encode(['error' => 'Not Found', 'detail' => 'No matching route in front controller.']);
}

write_debug_log("--- End of index.php execution ---");
exit;
?>
- api.php の作成:
APIのトークンでの認証のチェックとリクエストデータのチェックを行うスタブファイルを作成します。
$ sudo vi /var/www/stub/api.php でファイルを作成し、以下の内容をコピー&ペーストして保存します。
<?php
// header('Access-Control-Allow-Origin: *'); // どこからでもアクセス許可するならワイルドカード

/*
$reqHeaders = apache_request_headers();
$allowedOrigin = array(
  'https://auth.example.jp/',
  'https://auth.example2.jp/',
);
if(in_array($reqHeaders['Origin'], $allowedOrigin)) header("Access-Control-Allow-Origin: {$reqHeaders['Origin']}");

header('Access-Control-Allow-Credentials: true'); // Basic認証やCookieのやり取り
する際は必要(ワイルドカード使用すると使えない)
header('Access-Control-Allow-Headers: Content-Type');
header('Content-Type: application/json; charset=utf-8');
*/

// Create a function to handle the API request
function handleApiRequest($data) {
    $response = [];

    // Parse request data
    $id = isset($data['id']) ? $data['id'] : null;
    $test_data = isset($data['testdata']) ? $data['testdata']: null;


    if (!$id || !$test_data) {
        // Return 400 Bad Request if data is missing
        http_response_code(400);
        $response['error'] = 'Bad Request: パラメータが不正です。';
        echo json_encode($response);
        return;
    }

    // Simulate successful processing
    http_response_code(200);
    $response['statusText'] = 'OK';
    $response['statusCode'] = '200';
    echo json_encode($response);
}
?>
- scim.php の作成:
SCIMのスキーマとユーザーのスタブファイルを作成します。(SCIMについての詳細はこちらを参照してください。)
$ sudo vi /var/www/stub/scim.php でファイルを作成し、以下の内容をすべてコピー&ペーストして保存します。
※'YOUR_API_TOKEN_HERE’の値には、テスト用のAPIトークンとして任意の複雑な文字列を設定してください。
<?php

// index.php から渡された元のREQUEST_URIを使用

$request_uri = isset($_SERVER['SCIM_ORIGINAL_REQUEST_URI']) ? $_SERVER['SCIM_ORIGINAL_REQUEST_URI'] : $_SERVER['REQUEST_URI'];

$request_uri_no_query = strtok($request_uri, '?');


// /v2/ から始まるパスを抽出

if (strpos($request_uri_no_query, '/v2/') === 0) {

    $path_info_scim = substr($request_uri_no_query, strlen('/v2'));

} else {

    $path_info_scim = $request_uri_no_query;

}


// Authorization token (index.phpで既に認証済みだが、scim.php単体テスト用に保持)

$bearer_token = 'YOUR_API_TOKEN_HERE';


header('Content-Type: application/json; charset=utf-8');


$response = [];

// HTTPメソッドとエンドポイントの取得

$method = $_SERVER['REQUEST_METHOD'];


// 認証ヘッダーの確認(index.phpで認証済みの前提だが、念のため)

$headers = getallheaders();

if (!isset($_SERVER['HTTP_AUTHORIZATION']) || $_SERVER['HTTP_AUTHORIZATION'] !== 'Bearer ' . $bearer_token) {

    http_response_code(401);

    $response['schemas'] = '["urn:ietf:params:scim:api:messages:2.0:Error"]';

    $response['detail'] = 'トークン情報が無効です。';

    $response['status'] = '401';

    echo json_encode($response);

    exit;

}


// SCIMエンドポイントの処理 Schemas

if ($method === 'GET' && strpos($path_info_scim, "/Schemas") !== false) {

    if (substr($path_info_scim, -8, 8) === "/Schemas") {

        http_response_code(200);

        $schema = json_encode([

            "schemas" => ["urn:ietf:params:scim:schemas:core:2.0:Schema"],

            "totalResults" => 1,

            "itemsPerPage" => 1,

            "startIndex" => 1,

            "Resources" => [

                [

                    "id" => "urn:ietf:params:scim:schemas:core:2.0:User",

                    "name" => "User",

                    "description" => "User Schema",

                    "attributes" => [

                        ["name" => "userName", "type" => "string", "multiValued" => false, "description" => "アカウントのユーザー名", "required" => true, "caseExact" => false, "mutability" => "readOnly", "returned" => "default", "uniqueness" => "server"],

                        ["name" => "displayName", "type" => "string", "multiValued" => false, "description" => "アカウントの表示名", "required" => false, "caseExact" => false, "mutability" => "readWrite", "returned" => "default", "uniqueness" => "none"],

                        ["name" => "nickName", "type" => "string", "multiValued" => false, "description" => "ニックネーム ", "required" => false, "caseExact" => false, "mutability" => "readWrite", "returned" => "default", "uniqueness" => "none"],

                        ["name" => "active", "type" => "boolean", "multiValued" => false, "description" => "アカウントの状態", "required" => false, "mutability" => "readWrite", "uniqueness" => "none"],

                        ["name" => "externalId", "type" => "string", "multiValued" => false, "description" => "一意の識別ID", "required" => true, "caseExact" => false, "mutability" => "readWrite", "returned" => "default", "uniqueness" => "none"],

                        ["name" => "name", "type" => "complex", "multiValued" => false, "description" => "アカウントの表示.", "required" => false, "subAttributes" => [

                            ["name" => "formatted", "type" => "string", "multiValued" => false, "description" => "アカウントの姓名", "required" => false, "caseExact" => false, "mutability" => "readWrite", "returned" => "default", "uniqueness" => "none"],

                            ["name" => "familyName", "type" => "string",

"multiValued" => false, "description" => "アカウントの姓", "required" => false, "caseExact" => false, "mutability" => "readWrite", "returned" => "default", "uniqueness" => "none"]

                        ]]

                    ],

                    "meta" => [

                        "resourceType" => "Schema",

                        "location" => "https://stub.example.com/v2/Schemas/User"

                    ]

                ]

            ]

        ], JSON_UNESCAPED_UNICODE|JSON_UNESCAPED_SLASHES);

        echo $schema;

        exit;

    } elseif (substr($path_info_scim,-13, 13) === '/Schemas/User') {

        http_response_code(200);

        $schema = json_encode([

            'id' => 'urn:ietf:params:scim:schemas:core:2.0:User',

            'name' => 'User',

            'description' => 'User Schema',

            'attributes' => [

                ['name' => 'userName', 'type' => 'string', 'multiValued' => false, 'description' => 'アカウントのユーザー名', 'required' => true, 'caseExact' => false, 'mutability' => 'readOnly', 'returned' => 'default', 'uniqueness' => 'server'],

                ['name' => 'displayName', 'type' => 'string', 'multiValued' => false, 'description' => 'アカウントの表示名', 'required' => false, 'caseExact' => false, 'mutability' => 'readWrite', 'returned' => 'default', 'uniqueness' => 'none'],


                ['name' => 'nickName', 'type' => 'string', 'multiValued' => false, "description" => 'ニックネーム', 'required' => false, 'caseExact' => false, 'mutability' => 'readWrite', 'returned' => 'default', 'uniqueness' => 'none'],

                ['name' => 'active', 'type' => 'boolean', 'multiValued' => false, 'description' => 'アカウントの状態', 'required' => false, 'mutability' => 'readWrite', 'returned' => 'default', 'uniqueness' => 'none'],

                ['name' => 'externalId', 'type' => 'boolean', 'multiValued' => false, 'description' => '一意の識別ID', 'required' => true, 'mutability' => 'readWrite', 'caseExact' => false, 'returned' => 'default', 'uniqueness' => 'none'],

                ['name' => 'name', 'type' => 'complex', 'multiValued' => false, 'description' => 'ユーザー名の構成要素.', "required" => false, 'subAttributes' => [

                    ['name' => 'formatted', 'type' => 'string', 'multiValued' => false, 'description' => 'アカウントの姓名', 'required' => false, 'caseExact' => false, 'mutability' => 'readWrite', 'returned' => 'default'],

                    ['name' => 'familyName', 'type' => 'string', 'multiValued' => false, 'description' => 'アカウントの姓', 'required' => false, 'caseExact' => false, 'mutability' => 'readWrite', 'returned' => 'default']

                ]]

            ],

            'meta' => [

                'resourceType' => 'Schema',

                'location' => 'https://stub.example.com/v2/Schemas/User',

            ]

        ], JSON_UNESCAPED_UNICODE|JSON_UNESCAPED_SLASHES);

        echo $schema;

        exit;

    }

} elseif (strpos($path_info_scim, '/Users') !== false) {

    $input = json_decode(file_get_contents('php://input'), true);

    switch ($method) {

        case 'GET':

            $url = $_SERVER['REQUEST_URI'];

            if (strpos($url, "filter") !== false) {

                $target_text = $_GET['filter'];

                $delimiter_start = 'eq ';

                $delimiter_end = '@';

                $start_position = strpos($target_text, $delimiter_start) + strlen($delimiter_start);

                $length = strpos($target_text, $delimiter_end) - $start_position;


                $uid = substr($target_text, $start_position, $length );

                http_response_code(200);

                $response_data = [

                    'schemas' => ['urn:ietf:params:scim:api:messages:2.0:ListResponse'],

                    'totalResults' => 1,

                    'itemsPerPage' => 1,

                    'startIndex' => 1,

                    'Resources' => [

                        [

                            'schemas' => ['urn:ietf:params:scim:schemas:core:2.0:User'],

                            'id' => trim($uid, '"'),

                            'userName' => trim($uid, '"'),

                            'extenrlId' => isset($input['externalId']) ? $input['externalId'] : '',

                            'displayName' => '',

                            'nickName' => '',

                            'active' => true,

                            'meta' => [

                                    'resourceType' => 'User',

                                    'location' => 'https://stub.example.com/v2/Users/'

                            ]

                        ]

                    ]

                ];

                echo json_encode($response_data, JSON_UNESCAPED_SLASHES);

            } else {

                http_response_code(200);

                echo json_encode([

                    'schemas' => ['urn:ietf:params:scim:schemas:core:2.0:User'],

                    'id' => 'dummyUser',

                    'userName' => 'dummyUser@example.com',

                    'extenrlId' => 'dummyUser@example.com',

                    'displayName' => 'Dummy User',

                    'nickName' => 'Dummy',

                    'active' => true,

                    'meta' => [

                            'resourceType' => 'User',

                            'location' => 'https://stub.example.com/v2/Users/dummyUser'

                    ]

                ], JSON_UNESCAPED_SLASHES);

            }

            exit;


        case 'POST':

            $input = json_decode(file_get_contents('php://input'), true);

            $atPosition = strpos($input['externalId'], '@');

            $userName = substr($input['externalId'], 0, $atPosition);


            if (!isset($input['externalId'])) {

                http_response_code(400);

                $error_response = ['error' => 'Bad Request', 'detail' => 'Missing required attribute: externalId'];

                echo json_encode($error_response);

                exit;

            }

            http_response_code(201);

            $response_data = [

                'schemas' => ['urn:ietf:params:scim:schemas:core:2.0:User'],

                'id' => $userName,

                'userName' => $userName,

                'extenrlId' => $input['externalId'],

                'displayName' => isset($input['name']['formatted']) ? $input['name']['formatted'] : '',

                'nickName' => isset($input['name']['familyName']) ? $input['name']['familyName'] : '',

                'active' => isset($input['active']) ? $input['active'] : false,

                'meta' => [

                        'resourceType' => 'User',

                        'location' => 'https://stub.example.com/v2/Users/' . $userName

                ]

            ];

            echo json_encode($response_data, JSON_UNESCAPED_UNICODE|JSON_UNESCAPED_SLASHES);

            exit;


        case 'PUT':

            http_response_code(200);

            echo json_encode(['message' => 'User updated successfully']);

            exit;


        case 'DELETE':

            http_response_code(204);

            exit;


        default:

            http_response_code(405);

            echo json_encode(['error' => 'Method Not Allowed']);

            exit;

        }

    } else {

        http_response_code(404);

        $response['schemas'] = '["urn:ietf:params:scim:api:messages:2.0:Error"]';

        $response['detail'] = 'Not Found for path: ' . $path_info;

        $response['status'] = '404';

        echo json_encode($response);

        exit;

    }

    ?>
- stub.conf の作成:
$ sudo vi /etc/httpd/conf.d/stub.conf でファイルを作成し、以下の内容をすべてコピー&ペーストして保存します。
#
# When we also provide SSL we have to listen to the
# standard HTTPS port in addition.
#

##
## SSL Virtual Host Context
##

<VirtualHost *:443>
# General setup for the virtual host, inherited from global configuration
DocumentRoot "/var/www/stub"
ServerName stub.example.com

DirectoryIndex index.php index.html

# PHP-FPMハンドラ設定 (test.phpやapi.phpが動作するためのもの)
<FilesMatch \.php$>
    SetHandler "proxy:unix:/run/php-fpm/www.sock|fcgi://localhost/"
</FilesMatch>

# 全てのリクエストをindex.phpにルーティングするフロントコントローラー設定
RewriteEngine On
RewriteCond %{REQUEST_FILENAME} !-f
RewriteCond %{REQUEST_FILENAME} !-d
RewriteRule . /index.php [L]

# DocumentRoot の設定に対する Directory ブロック (重要)
<Directory "/var/www/stub">
    Options FollowSymLinks
    AllowOverride All
    Require all granted
</Directory>

# Use separate log files for the SSL virtual host; note that LogLevel
# is not inherited from httpd.conf.
ErrorLog logs/ssl_error_log
TransferLog logs/ssl_access_log


LogLevel trace8

#    SSL Engine Switch:
#    Enable/Disable SSL for this virtual host.
SSLEngine on

#    SSL Protocol support:
# List the enable protocol levels with which clients will be able to
# connect.  Disable SSLv2 access by default:
SSLProtocol all -SSLv2 -SSLv3 -TLSv1 -TLSv1.1

#    SSL Cipher Suite:
#    List the ciphers that the client is permitted to negotiate.
#    See the mod_ssl documentation for a complete list.
#SSLCipherSuite HIGH:3DES:!aNULL:!MD5:!SEED:!IDEA
SSLCipherSuite ECDHE-RSA-AES256-GCM-SHA384:ECDHE-RSA-AES256-SHA384:ECDHE-RSA-AES128-GCM-SHA256:ECDHE-RSA-AES256-SHA:DHE-RSA-AES256-GCM-SHA384:DHE-RSA-AES256-SHA256:DHE-RSA-AES256-SHA:!RC4:!LOW:!MD5:!aNULL:!eNULL:!3DES:!EXP:!PSK:!SRP:!DSS:!ADH:!DH

#    Server Certificate:
# Point SSLCertificateFile at a PEM encoded certificate.  If
# the certificate is encrypted, then you will be prompted for a
# pass phrase.  Note that a kill -HUP will prompt again.  A new
# certificate can be generated using the genkey(1) command.
#SSLCertificateFile /etc/pki/tls/certs/localhost.crt
#SSLCertificateFile /etc/pki/tls/certs/server.crt
SSLCertificateFile /etc/pki/tls/certs/localhost.crt

#    Server Private Key:
#    If the key is not combined with the certificate, use this
#    directive to point at the key file.  Keep in mind that if
#    you've both a RSA and a DSA private key you can configure
#    both in parallel (to also allow the use of DSA ciphers, etc.)
#SSLCertificateKeyFile /etc/pki/tls/private/localhost.key
#SSLCertificateKeyFile /etc/pki/tls/private/server.key
SSLCertificateKeyFile /etc/pki/tls/private/localhost.key

#SSLCACertificateFile /etc/letsencrypt/live/stub.example.com/chain.pem

#<LocationMatch "^/(?!.well-known/acme-challenge)">
#    Require all granted
#</LocationMatch>


</VirtualHost>
- SELinuxのファイルコンテキストの修正:
ファイルが正しくApacheからアクセスできるようにSELinuxコンテキストを設定します。
$ sudo semanage fcontext -a -t httpd_sys_content_t "/var/www/stub(/.*)?"
$ sudo restorecon -Rv /var/www/stub
$ sudo semanage fcontext -a -t httpd_config_t "/etc/httpd/conf.d/stub.conf"
$ sudo restorecon -v /etc/httpd/conf.d/stub.conf
$ sudo semanage fcontext -a -t httpd_var_run_t "/var/run/php-fpm/www.sock"
$ sudo restorecon -v /var/run/php-fpm/www.sock
$ sudo setsebool -P httpd_unified 1
- ディレクトリのパーミッション設定:
/var/log/httpd/ ディレクトリに、apache ユーザーが書き込みできるようにします。
$ sudo chown root:apache /var/log/httpd/
$ sudo chmod 775 /var/log/httpd/
- Apacheサービスの再起動:
$ sudo systemctl restart httpd7. 動作確認 (cURLコマンド)
Apacheが正常に起動したら、ご自身のPCのコマンドプロンプトで以下のcURLコマンドを実行し、APIスタブが期待通りに応答するかを確認してください。
※PC上のcURLコマンドは、Windowsコマンドプロンプトの場合、複数行のコマンドは行末に ^ を付け、JSON文字列内の " は \" とエスケープします。
※cURLコマンド内の'YOUR_API_TOKEN_HERE’の値は、構築手順の中で設定済みのAPIトークンに置き換えてください。
- test.php の動作確認 (PHP環境が正しく動作することを確認)
> curl -k -H "Authorization: Bearer YOUR_API_TOKEN_HERE" https://stub.example.com/test.php
- 期待される出力: PHP情報ページ(phpinfo())のHTMLが出力されます。
- api.php のテスト (APIが正常に応答することを確認)
> curl -k -X POST -H "Authorization: Bearer YOUR_API_TOKEN_HERE" ^
-H "Content-Type: application/json" ^
-d "{\"idd\": \"testId\", \"test_data\": \"testrequest\"}" ^
https://stub.example.com/api.php
- 期待される出力: {"statusText":"OK","statusCode":"200"}
- SCIMスキーマ取得のテスト (GET /v2/Schemas)
> curl -k -H "Authorization: Bearer YOUR_API_TOKEN_HERE" https://stub.example.com/v2/Schemas
- 期待される出力: SCIMユーザーリソースのスキーマ定義のJSONデータ。例: {"schemas":["urn:ietf:params:scim:schemas:core:2.0:Schema"],"totalResults":1,...}
- SCIMユーザー作成のテスト (POST /v2/Users)
> curl -k -X POST -H "Authorization: Bearer YOUR_API_TOKEN_HERE" ^
-H "Content-Type: application/json" ^
-d "{\"schemas\": [\"urn:ietf:params:scim:schemas:core:2.0:User\"], \"externalId\": \"testuser@example.com\", \"userName\": \"testuser@example.com\", \"displayName\": \"テスト ユーザー\", \"nickName\": \"テスト\", \"active\": true, \"name\": { \"formatted\": \"テスト ユーザー\", \"familyName\": \"テスト\" } }" ^
https://stub.example.com/v2/Users
- 期待される出力: 作成されたユーザー情報を含むJSONデータ。例: {"schemas":["urn:ietf:params:scim:schemas:core:2.0:User"],"id":"testuser",...}
- SCIMユーザー取得のテスト (GET /v2/Users?filter=userName%20eq%20%22testuser@example.com%22)
> curl -k -H "Authorization: Bearer YOUR_API_TOKEN_HERE" "https://stub.example.com/v2/Users?filter=userName%20eq%20%22testuser@example.com%22"
- 期待される出力: フィルターに合致するユーザー情報を含むJSONデータ。例: {"schemas":["urn:ietf:params:scim:api:messages:2.0:ListResponse"],"totalResults":1,...}
8. サーバーログの確認 (問題発生時やデバッグ終了後)
cURLコマンド実行後、EC2インスタンスにSSH接続し、以下のコマンドでログファイルが生成され、内容が記録されているかを確認してください。
$ sudo cat /var/log/httpd/request_debug_main.log
$ sudo cat /var/log/httpd/php_errors_main.log
- request_debug_main.log にPHPスクリプトの実行フローに関する詳細なログが記録されます。
- php_errors_main.log にPHPエラー(Warning, Notice, Fatal Errorなど)が記録されます。
ここまでの手順で、AWS上にPHP APIスタブ環境が無事に構築され、すべてのAPIが機能することを確認できるはずです。お疲れ様でした。